Showing posts with label sew. Show all posts

Tuesday, August 02, 2022

Toddler Dress and Bloomers


When an outfit makes you feel goooood
💁‍♀️
My mom made the top and bloomers for Harlow when she was a toddler, and now Elodie is wearing the outfit. I made the headband when Harlow was little.
The outfit pattern is Simplicity 2375. I realized after the pictures that I should have ironed the top before she wore it, but oh well.

Open Back Tank Top

I’ve been wanting to make a top with this hand-me-down fabric for awhile but couldn’t make up my mind on what to do. So I made my own pattern.

Now, I know what you’re thinking, because it’s what I think when I see posts about self-drafted patterns— that doesn’t help me! How am I supposed to make that without any instructions or patterns? Well, if you want to make something similar, go check out Jenna Phipps’ YouTube video DIY Summer Dress. It has a similar look, can be made into a shirt, and is a bit more simplified in that you don’t have to curve around your armpit or have buttons like I did. She’ll walk you through the process. It’s a good beginner project.
Back to what I did…. I wanted the top to be somewhat fitted at the bust, so that meant I needed a way to open it to put it on/take it off. I did buttons in the back. If you go with a looser fit, you can just slip it over your head and skip this. I didn’t have enough fabric to do a ruffle all the way around, so I did a ruffle in the front and left it flat in the back. I also left the back open, because it is really hot here and all the airflow is needed to keep cool. I didn’t do a lining, but I did use a serger to finish all the seams and edges.
I drafted a paper pattern for this so I could get the fit just right and use it for future projects. Making a pattern takes a little more time in the beginning but saves a lot of time in the end when you want to make more of the same top. Making adjustments and changes is easy when you have a base to start from. This garment is my wearable toile and will help me get the pattern just right for future garments. I think I want to do a front button top and no ruffle layer the next time.


Core T-Shirt (Free Pattern)

Here’s a free sewing pattern! This is the Core T-Shirt from Closet Core Patterns.

I made the shirt with linen fabric. The pattern calls for fabric with more stretch, but it worked just fine! The only thing I would change if I made it again with similar fabric is enlarging the neckline so it’s easier to slip on and off since the fabric doesn’t stretch. I also found that I had to cut the neckband on the bias. I made the pattern according to my measurements. It’s very flowy and a bit boxy. I think I could size down, but it doesn’t feel too oversized as is.
I hemmed the bottom of the shirt and finished the sleeves using Sweet Red Poppy serger technique from her free dolman shirt tutorial (which is on my list to make).
This is a quick, satisfying project, and I would definitely make it again. It also comes with a cropped version and long sleeve version.


Tuesday, November 16, 2021

Clothes from Scraps

I had a maxi dress that needed to be hemmed. It was over a foot too long. When I finally got around to hemming it, I decided to make it midi-length, which gave me even more extra fabric. I also had to take it in at the sides. You can see the result of how my dress turned out in the last photo.

With all the extra fabric, I decided to make matching outfits for my girls. I made my oldest a pencil skirt that I drafted from a Lutterloh pattern. I made my youngest a dress from a pattern that was my grandmother’s. No fabric went to waste, and my girls got new outfits without spending a dime!


Thursday, October 28, 2021

A Pumpkin Skirt Made for Twirling


I bought this pumpkin fabric over a year ago in the last trimester of my pregnancy. I thought I could make something cute before the baby (Elodie) got here. The problem was I was too mentally tired to decide on what to make and too physically tired to make it.


A year later I pulled it from the pile I keep of things that need to be mended or finished up. I asked Harlow if she wanted a Halloween skirt to match the sequin pumpkin shirt I got her at Walmart. She said yes!

Instead of cutting a rectangle and sewing it up, I cut a sort of trapezoid shape to give more fabric at the bottom to make it twirl. I’m not sure I would go that route again, but it definitely twirls more than a rectangle skirt. I might try a circle skirt next time. I put elastic in the waist to make this an easy project. 

Now, what else has been waiting for me in that to-finish pile…

Wednesday, October 06, 2021

Gathered Skirt from a Men's Shirt


I made this skirt and then worried that the colors were too springy to be able to wear it for the fall. Then I realized you can put a cardigan over anything to make it work for autumn!

This skirt is similar to the idea of the plaid skirt in my last post. Instead of being fitted, though, we’re getting a bit of volume with some gathering at the waist.

Here was my process in turning my husband’s old shirt into a skirt for me:
•I didn’t take any width out of the shirt. I decided to use it to have some fullness.
•I used a seam ripper to remove the shirt pocket and cut off the top of the shirt to get the length I wanted.
•I used the top of the shirt to make a waistband.
•I gathered the skirt to the waistband. I really just folded and tucked it in place every couple inches.
•The skirt wound up being fuller than I wanted, so I took it in at the sides. It would be best to do this at the beginning, but sometimes we just roll with it.
•Men’s shirts don’t button all the way down, so I sewed another button hole at the bottom. The great thing is men’s shirts do come with spare buttons, so I didn’t have to find a matching one in my stash.
•I didn’t have to hem the bottom since I left and used the shirt hem.

I think I’ll be able to make this skirt work year round with different tops and shoes!

Also, these pictures are reminders that I need lipstick to bring a little color to my face!💄 

Friday, October 01, 2021

Off-the-Shoulder Dress from Men's Shirt

I needed to add some pink to my wardrobe 🌸


To make this off-the-shoulder dress, I took one of my husband’s dress shirts, cut it up, and then put it back together using Lutterloh pattern 201/202. I used French seams to keep the dress shirt look and reconstructed the sleeves to my size. I like that the pattern took a lot of the guess work out of sizing, darts, and so on, making sure that I got the most use out of the fabric since there wasn’t an abundance of material to work with. You could probably hack this without a pattern, though

This could be worn as a dress or a tunic. I think I’ll unbutton a few of the bottom buttons when wearing it with higher waisted jeans. It would be cute tucked into a longer skirt (doubling as a shirt!).

This shirt is the brand Forsyth of Canada, a nice quality shirt that you can feel and see in the fabric’s texture. Thanks, husband, for it not working for you anymore so I could butcher it!

It’s been a challenge making new garments from existing garments, because it really pushes you to be precise since you can’t run out and buy more matching fabric if you mess up or miscalculate. It saves a lot of money that would have been spent on new fabric and buttons, though!

Tunic from a Men's Shirt

It doesn’t look like I did much, but I reconstructed another one of my husband’s old shirts. I took it completely apart, cut it to a Lutterloh pattern, then changed the pattern a bit. I sewed French seams, added darts at the bust, made the shirt and sleeves slimmer, shortened the sleeves, reattached the collar and made a v-neck. 🥵

It wound up being too short for my liking as a dress, so I’ll wear it as a tunic or will make it into a shirt. I guess the work isn’t over for this piece yet.

Puffy Sleeve Blouse from a Men's Shirt (Plus Sizing Tips)


I’m embracing the puffy sleeve trend with both arms (pun intended).

I cut up another of my husband’s old shirts to make something for myself. I used Lutterloh pattern 171 for the shirt bodice.

I didn’t use a pattern for the sleeves. I left them in tack instead of taking them apart and cutting them to a smaller pattern. I shortened them a bit at the cuff and then made them fit into the armholes, gathering them and resulting in a puffy sleeve.

Sizing Tip for Refashioning Men’s Shirts:

I hope my experiment in upcycling my husband’s old shirts has inspired you to try refashioning some clothes! I often restyle my own clothes but never think to post about it. I haven’t thought it would be that interesting.

When I started going through a pile of my husband’s shirts (another story for another day of why I have a pile), I thought I’d show you how I transform or tweak them. This is something you can do too!

If you grab a shirt from your husband’s closet or go hunting at thrift stores, here’s what I’ve found to work for me on sizing: go up at least two sizes.

I wear a small in men’s shirts in the bust. If I want to button them through the hips, I would need a medium since most men’s shirts fall straight and don’t allow for hips that are larger than bust measurements. That means I need to go up two sizes from a medium. That gets me at an XL, which happens to be what my husband most often wears. The reason you need to go up at least two sizes is to allow for seam allowance, hemming, having enough materials for facing, waistbands, etc.

If you are only using a portion of the shirt (for a skirt or small tank or kids clothes), you could make do with a smaller size.

If you need a larger shirt than what’s available or have a bigger project, you could find a few shirts that coordinate and Frankenstein them together.

I’ll soon be sharing two skirts I have made that are good beginner projects if you’re ready to give it a go!

Buffalo Plaid Skirt from a Men's Shirt


Here’s your weekend project— an easy skirt made from a shirt!

There’s no pattern, and it’s beginner friendly. It’s just two flat pieces sewn together!

Grab a shirt that has plenty of room to fit around your hips and enough fabric for a seam allowance. You can use your waist and hip measurements to trace out the skirt, or grab a skirt that you already have and trace it onto the shirt fabric, adding seam allowance.

I did French seams, but you can just do a straight stitch down each side and not worry about finishing the seams inside the skirt.

I made a waistband, but you could fold the top over and stitch it in place. Just be sure that you don’t sew the top closed where it buttons since you need to unbutton the skirt to put it on.

Don’t have a sewing machine? There are fabric glues you can use until you work up the nerve to learn sewing. Learning to piece fabric together and understanding garment construction is a good place to start, and I won’t tell anyone you used glue!

I didn’t have to hem the bottom, because I left the original shirt hem.

You could use a seam ripper to remove the pockets, but I liked the look of leaving them.

If you make this or any recycled men’s shirt, tag me in your photos so I can see!

Wednesday, August 25, 2021

Dressing My Edema

I have a condition called idiopathic cyclic edema, and when it flares, it makes me feel pretty self-conscious. My arms get swollen, my face fills with fluid, my tummy pokes out, and my legs get covered with dimples from the fluid that takes over. We won’t talk about the physical pain that comes with it. Whew. Kind of a downer, huh?


Let’s talk about how I cope with dressing myself when all this takes over. I try to cover my arms so it’s one less thing for my mind to worry over. I wear a shirt that has some flow in the middle for comfort. I no longer try to cover up my legs just for the sake of covering dimpling, because pants can be painful. My body expands as it fills with fluid, and clothes that don’t move and expand with my body can cause even more discomfort to my aching joints. Bike shorts have worked wonders for me this summer around the house.

I made this shirt to meet some of my edema needs and to be easy to nurse my baby. I made a rough pattern from a t-shirt that was flowy. I cut up one of my husband’s old linen dress shirts. Then I reassembled it according to my pattern, used French seams to keep the dress shirt look, went with short sleeves, and added some interest with the hem. I plan to wear it buttoned up with skinny jeans and a cardigan in the fall. If I’m wearing high-rise pants, I like it half buttoned. It’s a simple shirt, but it accommodates my needs. 


I guess I share all this to say I understand if you have some insecurities and if you have some physical ailments that really carry over to emotional burdens you fight each day. Thank God that He sustains me and teaches me through it all. 💛

Tools I Use to Draft Patterns


I’m pretty new to drafting patterns, but I’ve found a good process with a few simple, inexpensive tools. I like reusing paper that comes in packages in the mail— that brown paper they smoosh to keep your items in place. It folds nicely, doesn’t tear easily, and is easy to write on. When I don’t have a stash of that on hand, I like the brown craft paper from Dollar Tree. You get a roll of it for $1 (duh), and it meets all the same criteria.


For marking I’ve tried different pens and markers and have found that I prefer a pencil with a thick lead. I’m using the Papermate 1.3mm mechanical pencil. The lead is thick enough to see the outlines and markings and doesn’t puncture the paper like a thinner lead. You also can erase your mistakes.

The first ruler I use is one I bought over a decade ago at Hancock Fabrics (RIP). You can find lots of clear ruler options in your store’s sewing supply section. I would like one that’s even longer for drawing long hemlines. I use a wooden yard stick when I need to, but there’s something so convenient about being able to see through the ruler to make sure you’re marking where you need to.


The second clear ruler is a square one from Fiskars that I picked up from Walmart. I use it for adding 1/2 inch seam allowances. There are lots of square ruler options, but I like that this one clearly has the seam allowance highlighted in orange.

Curved rulers (not pictured) made for marking arms holes and sleeves and other curves are definitely handy, as well. I use the Lutterloh brand, but you can find other brands at sewing supply stores. These aren’t essential for getting started but are definitely helpful.

These few tools have made it so much easier to make my own patterns, whether I’m tracing store-bought/ready-made clothes or using a drafting system like Lutterloh. If I can make my own patterns, so can you! Having the right tools sets you up for success and for a more enjoyable experience!

Friday, August 11, 2017

3XL T-Shirt Turned Into Toddler Tunic


Turning an adult t-shirt into a shirt/dress/tunic for a child is not a difficult task.  It takes beginner sewing skills, some patience, and the mindset that you're okay with not having absolute perfection.

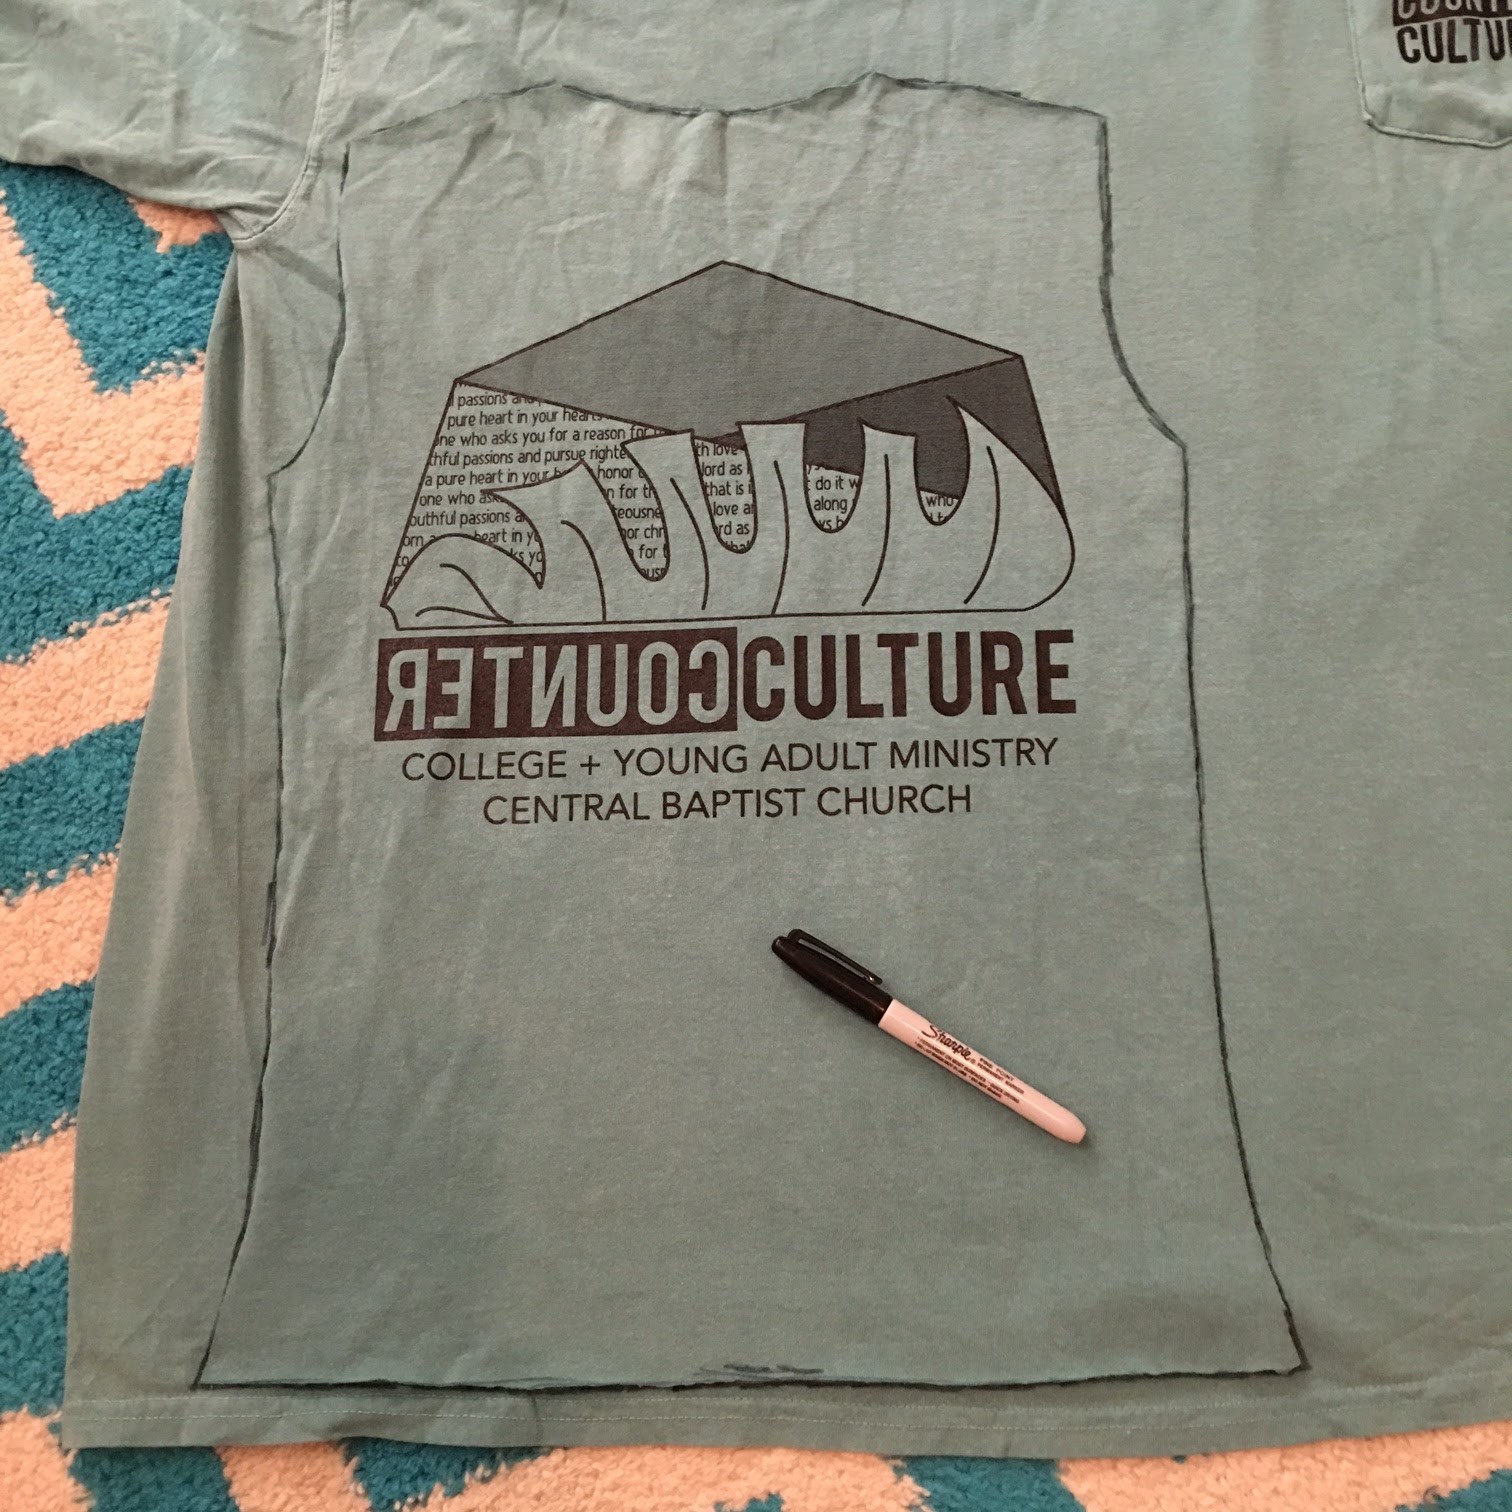
We ordered some shirts for our college group at church, and a 3XL shirt had a bleached spot on the front.  The company refunded us for it, and I pulled it to make a shirt for Harlow.  I knew that I wanted to make the shirt a little big so it could grow with her.  I also wanted to keep it long so she could wear it as a dress or a tunic with leggings.  As she grows, it will become more fitted and short enough to be a shirt.  If you wanted a more fitted shirt for your child, you can follow these same instructions to achieve that.

This shirt is not going to be perfect.  I don't have a serger, which is necessary to completely recreate a shirt.  My measurements are barely even measurements.  This is more of a fun project that you can do in a snap.  Have an old band tee that would look adorable on your toddler?  This is the perfect way to get that rock-n-roll, easy style.

You just need a pair of good scissors (buy some fabric scissors...they're not expensive, and they'll make your job easier) and a simple sewing machine.  You might also want some elastic.

Let's get started!  Click the photos to make them larger.


The front of the shirt has a pocket, and the back has a large design.  I want the back of this shirt to be the front of the toddler shirt.  I'm not going to be using the pocket in this project.


To make the toddler shirt, you could take your toddler's measurements, asking her to stand still and to stand up straight and to let you measure everything needed to make a custom shirt.  You go right ahead.  I grabbed two items out of her closet to use as guides.

First, I grabbed an oversized tank.  Harlow wears a 2T and is almost fitting into 3T items.  This tank is a 4T, making it very large on her.  It fits her like a tunic.  I used the tank to get all the measurements.  I want this shirt to fit her like the tank.  Second, I grabbed a dress.  I want this shirt to be a little longer than the tank so she can wear it as a dress.  I grabbed a dress that hits her a little below the knee to use as a guide for the length.


First, I traced the top and sides of the tank.  Then I made a mark where the bottom of the dress fit and freehanded the length across the bottom.  I made sure to trace away from the tank and dress a bit to leave room for a hem and seams. You can leave 1/4 inch, 1/2 inch, 5/8 inch, whatever floats your boat for seam allowance and a hem.  You do you.

Now cut that tank out with some good scissors, making sure to only cut into the back of the shirt-- don't cut the front yet!


Since tracing a tank doesn't insure perfect measurements, I folded the shirt in half and trimmed any material that didn't match up.  This doesn't make the measurements perfect; it just makes them match so your finished product isn't crooked...or any more crooked than necessary.


Now that the front of our shirt-in-the-making is cut, we're going to use it as a template to make the back of the shirt...that we're cutting out of the front of the shirt.  Got it?

Lay the freshly cut shirt down on the front of the shirt, and trace around it as closely to the shirt template as possible.  Then cut out what you just traced.  Now you have a front and a back!


Place right sides together, and pin in place.  Get that sewing machine ready.


Sew the sides together (photo 1).  I just used a straight stitch, but use a zig zag stitch or serger if you prefer.  Somebody get me a serger!

Be sure not to sew the neck opening, arms, or bottom.  Just the sides!

Next, fold and pin the bottom of the shirt to make a hem.  I just folded it once, but folding it over twice would mean you wouldn't have any raw edges showing on the inside.  Or you can use a serger...which I don't have.  Sew up that hem! (photos 1, 2, 3).

At this point, I went ahead and "hemmed" the arm holes in the same way I sewed the bottom hem.  Somehow I didn't get a picture of it, or I deleted it.  The original tank that I used for measurements had the armholes sewn with a serger instead of hemmed.  Oh, a serger would be nice.  Except that's one more machine I'd have to switch between.


Now comes the part that seems like would be really intimidating, but it's really not!  Let's put a collar on this shirt!

I got out that tank again and measured where the neck started at the shoulders on both sides and where it came down on the chest.  Make those three marks with a sharpie.


Cut the collar off the shirt we're destroying (photo 1).  Use the tank to measure what size the collar should be (photo 2), cut but leave room for some overlapping for the next step (photo 3), then sew the ends of the collar together, folding over the raw ends (photo 4).


Lay the collar right side down (face down) on the shirt.  Use the three marks (2 shoulder markers and 1 chest mark) as guides to where the collar should be pinned.  Pin the collar around the neck of the shirt (photos 1 and 2).

Sew the collar to the shirt (where my nail is pointing in photo 3).

Once sewn into place, trim away the excess fabric sticking up out of the neck, trimming close to the collar but not cutting into the collar (photo 4).


You just put a collar on a shirt!


This last step is optional but is something you'll want to do if you're making the shirt oversized like I did.  I didn't want to the shirt to completely swallow Harlow up or to fall off her shoulders.  I added some elastic at the upper back.  In my opinion, a thinner elastic works better, but I used what I had in my stash.

Mark where you want the elastic to go when it's fully stretched (photo 1).

Sew one end in place.  Then stretch the elastic to it's next mark, and sew that end in place (photo 2).

Sew down the center of the elastic, stretching it as you go (photo 3).

When you let go of the elastic, it will cinch back up, cinching the shirt with it.  Again, a thinner elastic will "ruche" a bit more and give the look I was really going for.  I may replace the elastic once I can run out and get the thinner elastic.  Can you tell I'd rather have used thinner elastic?


Now you have a completed shirt!  This top should last Harlow for a few years!.

I hope this gave you some inspiration of making some KEWL (the kids still say that, right? 😂) clothes for your kiddos.  It's a fun project that doesn't require perfection!


Related Posts Plugin for WordPress, Blogger...