Tuesday, December 22, 2015

Delicious, Simple Sugar Cookies

What is it about Christmas that makes you want to make sugar cookies?  Is it the icing or fun cookie cutters?  When did the sugar cookie become THE cookie for Christmas?
I may never have the answer to that life question, but I'm fine with it!  Maybe because sugar cookies are fun to decorate and beg for children to get involved.  Or maybe Santa sent out a memo declaring it as his favorite cookie.  Who knows?  Who cares?  Let's get on with the cookies...

I found the perfect sugar cookie recipe from Life, Love & Sugar.  Make this cookie exactly as the woman tells you.  You won't regret it.  It's slightly soft, slightly sweet, and holds it shape.
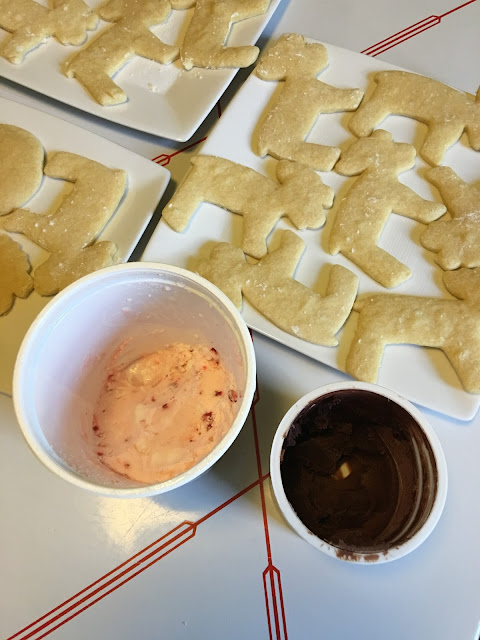
I used a moose cookie cutter (because all other Christmas cutters were hiding) and got 16 moose cookies and one round cookie. [You'll notice in a later picture there is one less moose cookie.  It needed to be consumed for quality control.]

My childhood nickname was Marla Moose, so I collected moose items from childhood through teenage years.  This moose cookie cutter was a gift and has been around for awhile.  I use it as a tree ornament, so I just had to grab it off the tree and wash it off to start making my cookies.

I used store bought chocolate icing and homemade strawberry icing.  Then added some sprinkles!

I only put a dab of chocolate icing on most of the cookies, because the cookie itself is really the star of the show.  It has such a great shape and great taste, and I didn't want the chocolate icing to overpower the cookie.

After I took a bite of the strawberry iced cookie, I decided that was the real winner.  The super sweet strawberry icing with the sugar cookie is a perfect combination.  I may have to dip the moose antlers in strawberry icing.  And their legs.  And their tails.  And my finger.
 

I'm putting some aside for my neighbor and for my family that's coming for Christmas, but Santa will have to find cookies at another house.  Sorry, Santa!

Monday, December 21, 2015

Christmas Gift Name Tag Ideas

If you have some last minutes gift wrapping to do and need ideas for unique name tags, here are two ideas to try out!

Let's start with the easiest first...

PHOTOS!

Everyone loves getting photos.  Pick one or two (or more!) photos of the gift recipient, and stick it on the gift.  No need to even write his/her name!
I ordered these square prints from Parabo (***$5 credit at the end of the blog post!), but since you don't have a lot of time to order photos, I suggest printing them out on cardstock at home or ordering one hour photos from Walgreens, Target, etc.  You could even order cardstock prints from Staples or another office supply store.  These are just fun little pictures to stick on the fridge or a bulletin board.


Second idea:

ORNAMENTS!

I made these ornaments on my embroidery machine, but you could make ornaments out of ANYTHING!  Decorate glass ornaments, have your kids watercolor on paper and then cut snowflake shapes, make cookies for each person and stick it in a plastic bag with their name on in it...the possibilities are endless!
How I did it: I embroidered on felt and used a tear-away backing.  I left the backing on and cut around the designs.  The backing helped maintain some stiffness and shape.  I glued ribbon on the back to make a hoop to hang the designs as ornaments.

I think there's something fun about personalizing gift wrapping for each person.  It doesn't have to be complicated or expensive.  Get creative!


***For $5 off your Parabo order, use code RIOYDB

Saturday, December 12, 2015

Embroidered Christmas Outfits for Harlow

We're busy enjoying December over here!  Our Christmas shopping is done, but presents still need to be wrapped.  The house is decorated, and Harlow has some outfits to celebrate the season!
We found this Christmas elf at Lowe's the other night.  She was quite taken with the nutcracker inflatable...and every other inflatable we had to walk up to and visit.

I embroidered two Christmas shirts for her from lynniepinnie.com.  I love the designs from that site, and they have great sales!
If you've ever read any of my other embroidery posts, then you know I like to embroider the designs not directly on the onesie.  Since these are for my daughter and she won't fit in these onesies next year, I like to have the ability to use a seam ripper to remove the design and sew it onto another shirt.  And that means I can reuse the onesie if we ever have another kid.  Frugality for the win!
After embroidering the pattern, I hand stitched them onto a piece of fabric and then used my sewing machine to sew that fabric on the onesie.
When I took these pics, the shirts hadn't been washed since being embroidered.  I like that when they are washed, the plaid frays a bit around the edges.  I stitch them so it will leave room for some fraying.  I'm wild like that.

It was hard for me to only make two shirts for her.  There are so many cute Christmas designs!

You can find the designs here:

Related Posts Plugin for WordPress, Blogger...