Showing posts with label wreath. Show all posts

Wednesday, October 26, 2016

Painted Corrugated Tin Fish Door Hanger


You'll see corrugated tin cut-outs all over this part of the state, especially at the lake.  They're used for door hangers and garden decor and come in all kinds of shapes for all seasons and holidays.

Since we were having a fish themed birthday party for Harlow, I wanted to make a tin fish.  I searched Pinterest for ideas.  I pretty much stole the painting idea from a fish I saw on Pinterest (I tried to link it, but the link is broken).  My dad had the tin for me to use.  You can check hardware stores or even flea markets for tin.

I'll walk you through how I made the fish.  Somewhere along the way I accidentally deleted some of the photos from me making the fish template, so we'll skip ahead a bit as far as the photos are concerned.

  • I taped together some newspaper and drew out the fish shape.  The great thing about this is you can make the drawing bigger or smaller or change the shape without ruining anything or having to start over since it's just newspaper.  You can see below where I changed the shape of the bottom fin a few times.  Once you get the shape you want, cut around the fish.
  • I laid the newspaper fish on top of the tin and used a sharpie to trace the template onto the tin.
  • Colin used an oscillating multi-tool to cut the tin.
  • I cleaned the tin (you could do it before cutting it) and let it dry.
  • I painted the fish.  After the paint dried, I sprayed a shiny clear coat on top to weather-proof the paint.
  • Colin used the smallest drill bit he had to drill small holes below the top fin.  I strung galvanized wire through them, using needle nose pliers to twist the ends of the wire so it would stay put.  I hid the wire behind the fish so they fish would hang higher on the gate and not touch the ground.
  • I hung it on the gate of our picket fence to welcome our family to Harlow's birthday party!

I let it hang the week of her party so she could enjoy it, but it didn't exactly go with the scarecrows on either side, so we've now put it away until summer.  Your size and paint possibilities are endless with this fish.  This was a fun project!


Thursday, October 06, 2016

Paintbrush Wreath


I know this trash to treasure project isn't going to be everyone's cup of tea, but if you have some unwashed paintbrushes, this might be just the idea for you!

I'm really not that bad about washing paintbrushes, but every once in awhile I just forget.  This is a few years worth of forgetting that I've been collecting.  If you don't have a stack of dirty/ruined brushes, you could buy some really cheap brushes at the craft store and dip them in some paint to get this look.

Let's get started!

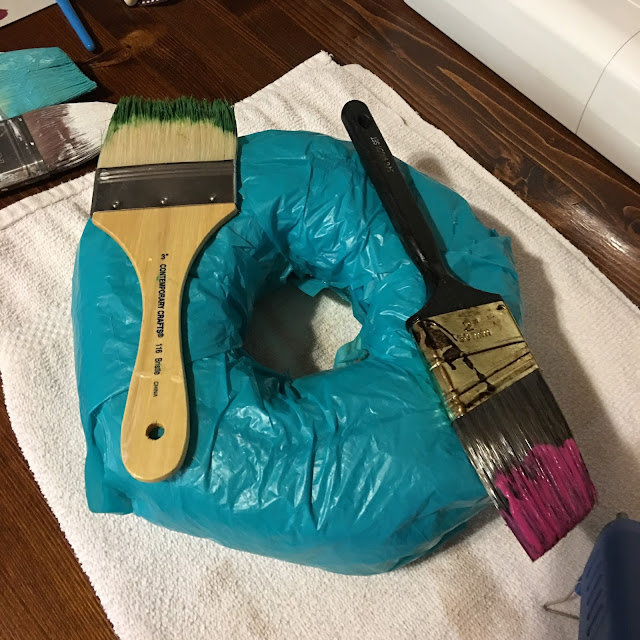
Grab a wreath form and a glue gun.  I used a styrofoam wreath, because they're cheap, and it's what I had in my stash.
Styrofoam wreath forms tend to disintegrate after awhile, especially in the rain, so I wrapped it in plastic bags to give it an extra layer of protection.  Be careful using the hot glue, because it will semi melt the plastic bags, and I don't want you to get burned!  I lastly wrapped it in a blue bag just so it would look pretty.

Now start layering your brushes, gluing as you go.  When all the brushes are glued in place, go back and glue any loose places.
I glued a ribbon on the back and glued pins into the ribbon to help hold it into place.
Hang that crafty baby!


Thursday, February 17, 2011

Tutorial: Yarn Wreath

I've seen a few yarn wreaths online, and each is a little different.  Here's how I made mine!


Materials:
*wreath foam (I got mine on the clearance aisle at Hobby Lobby)
*yarn (I had this in my yarn bag, but you could pick this up for a couple dollars)
*2 pins (or glue)


I took the end of the yarn and pinned it to the back of the wreath foam. You could use glue, but I didn't want to wait for it to dry.

I simply starting wrapping the yarn around the foam.
This took FORRRREVVVVERRR because I wrapped each piece exactly next to each other and made sure there were no gaps.  An easier way would be to wrap one layer quickly then wrap a second layer on top of that, but that would give you a slightly different look.  I did this while watching tv at night, so I was easily distracted :)
Not pictured (because I got too excited at finishing and forgot): When I was back to my starting point, I pinned the end of the yarn to meet up with the first pin. Again, you could use glue instead.  I also cut a few strands of yarn and tied them into a bow.

I think it's quite charming!
(The picture in the background is a birthday present I bought myself last July.  It's still waiting to be hung up...whoops!)
Related Posts Plugin for WordPress, Blogger...